mtl-main-logo-white
General info
API Documentation
Using LIS

Using LIS

In-Page Links: (Back to top)

Register a Kit

Place a Self-Collect Order

Check Results

Set Up Notifications

Reset Your Password

Place a Toxicology E-Order

How To Register a Kit

Patients who register their kit from Molecular Testing Labs are able to retrieve their diagnostic results directly from our secure portal. This capability is only available under strict circumstances, so please speak to your account manager or sales rep to understand if this is available to you.

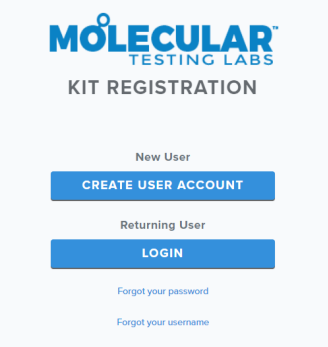
Kit Registration Login
https://register.moleculartestinglabs.com/

If you’re a first-time patient, click Create User Account to create a new account and register a kit.

If you’re a returning patient, click LOGIN.
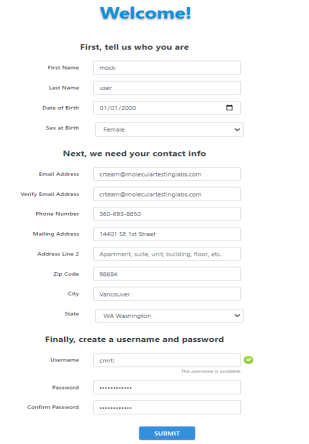
file-A0HpY5o3Df


Create Your Account

Here, you will need to fill out the registration page. ALL FIELDS ARE REQUIRED.

file-4tOdiG7LTC


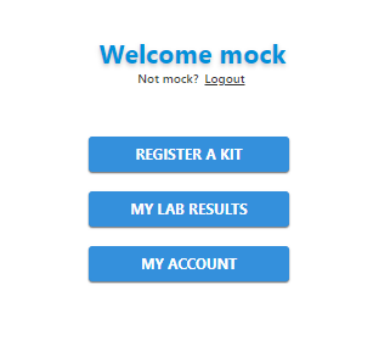
Registration Home Page

Once the account is created, you have the ability to:

  • Register your kit
  • View lab results
  • Access account details
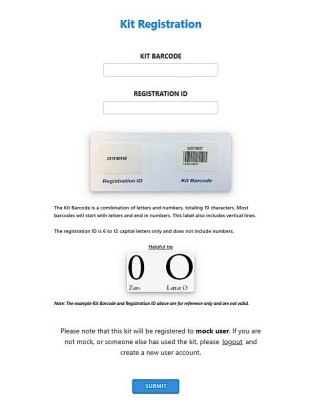
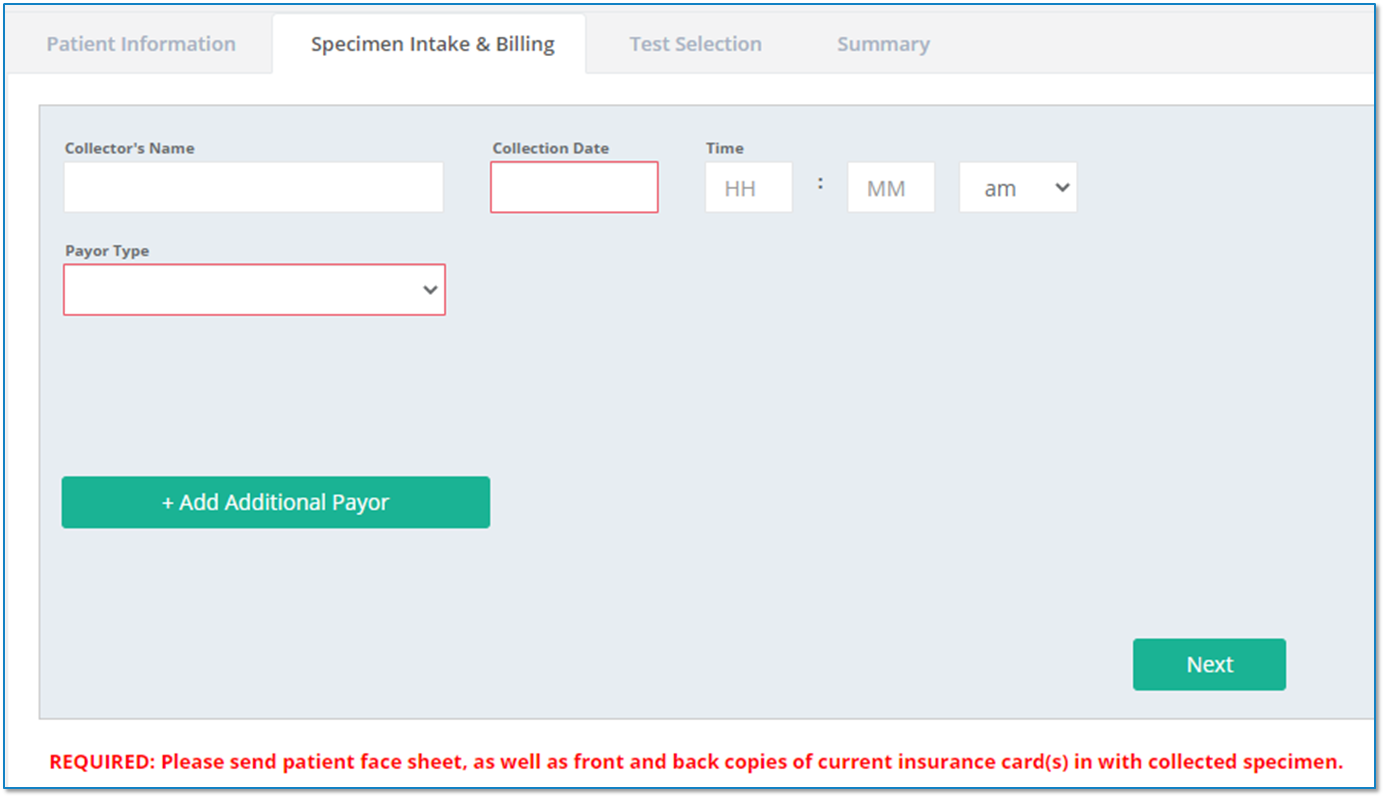
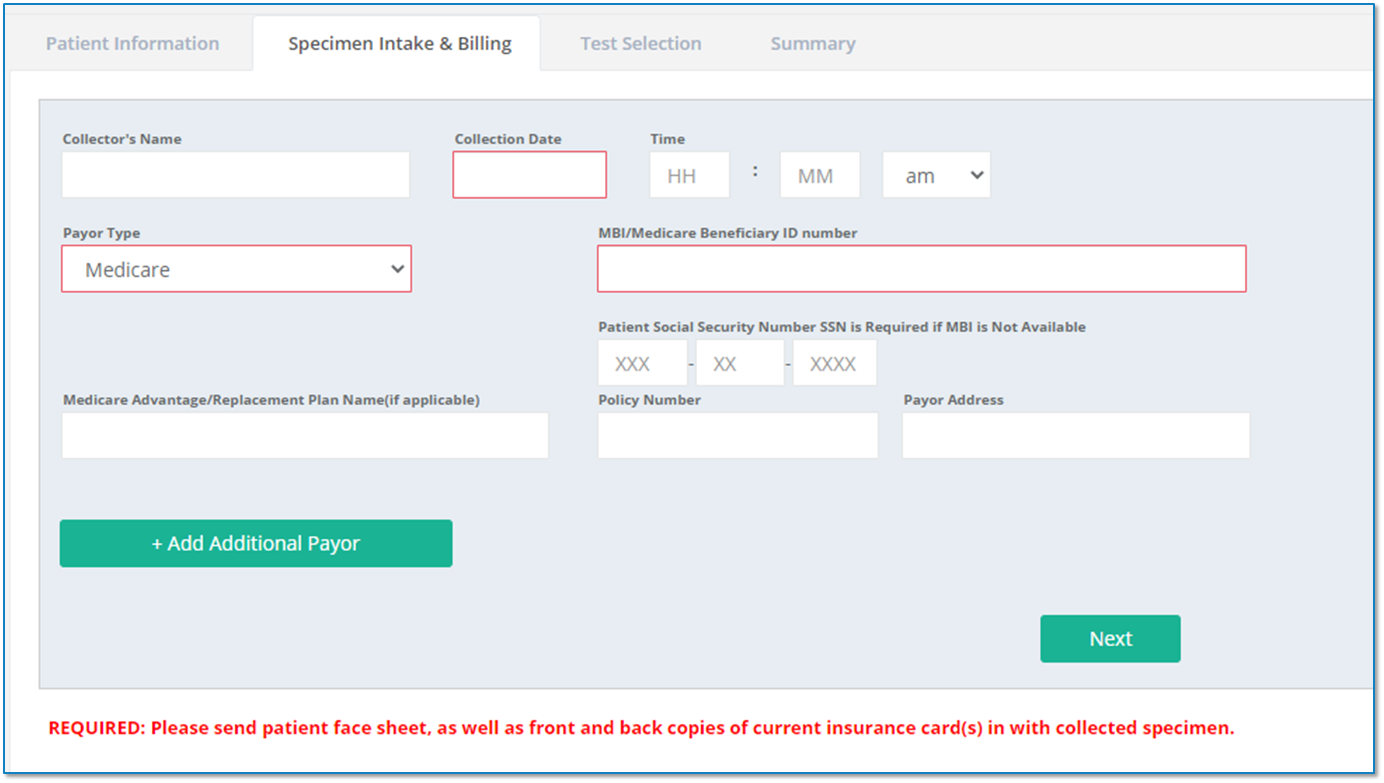
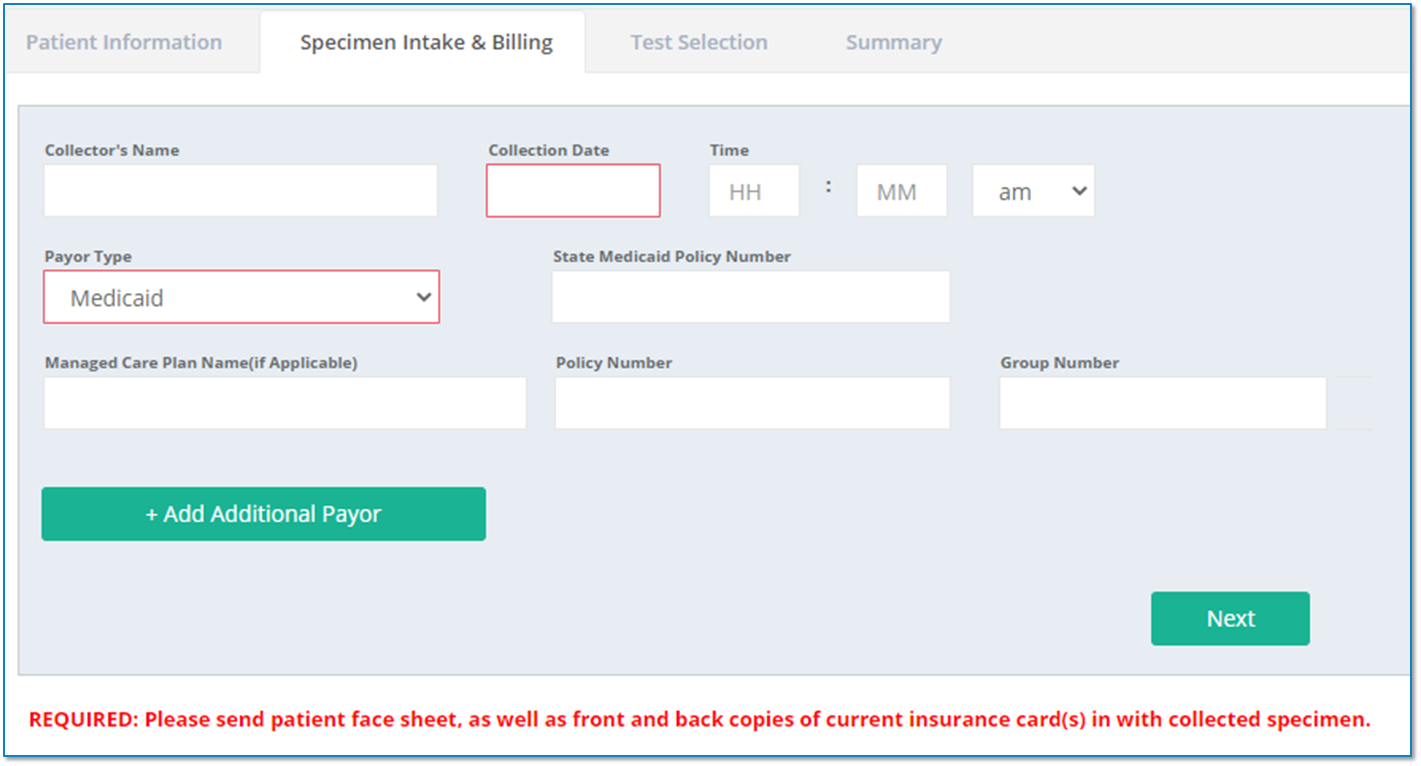
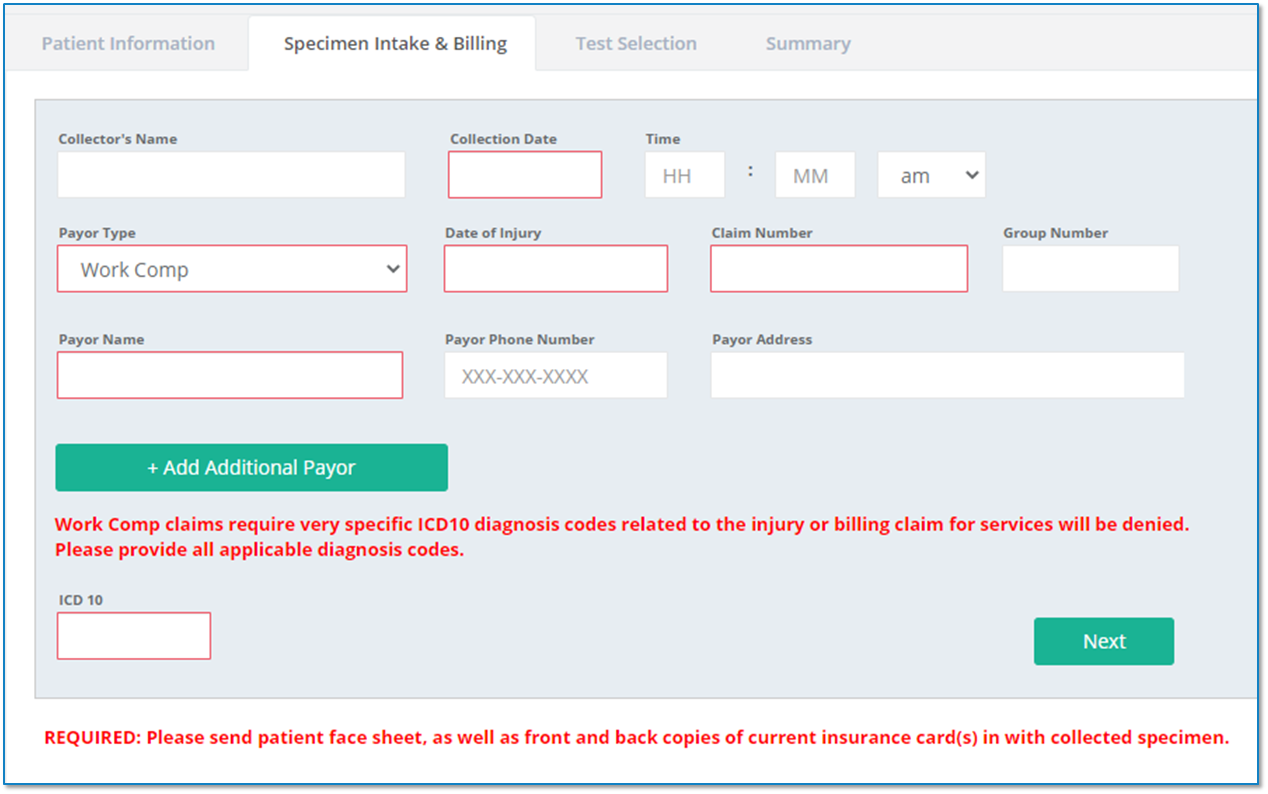
file-bEif795zOS


Kit Registration

In the Kit Registration page, you will need to enter the following information to register a new kit:

  • Kit Barcode
  • Registration ID
file-mYW9QtSoUI


My Lab Results

The My Lab Results page is where you can view the status and results of your tests!

Account Information

In the My Account page, you can access your account information and edit as needed!

[Last updated on March 1, 2022]

How To Place A Self-Collect Order

If you are using our Self-Collect ordering tab, you'll find instructions on placing an order through our portal below.

NOTE: Before you can order, you'll need to create a new password.

Once you receive the welcome email from registration, navigate to the portal and create a new password.


  1. Once logged in, click on the Internet Order Tab and select Self-Collect Order Entry.
  2. Fill in the required patient information
  • The following fields are required:
    • Practice (if you have more than one account you may place orders for)
    • Date Ordered
    • Patient Name
      • First
      • Last
    • Patient DoB (mm/dd/yyyy format)
    • Patient Email
    • Patient Phone Number
    • Patient Address
      • Street 1
      • City
      • State
      • Zip Code
    • Sex at Birth
  • The country should be set the USA.
  • Please ignore the PWN Req Number unless specifically instructed to use it by your account manager.
  1. Select the tests that you would like included in the shipment.
    • If you would like devices to go out in separate packages, please submit them as different orders.
  2. Click Create Order to complete the order submission.

[Last updated on December 21, 2021]

How To Check Results

If you placed orders through the Self-Collect ordering tab, you'll find instructions on retrieving order results below.


  1. Start by navigating to Order List on the left hand menu.
    • Here you will see a list of all of your orders that have had samples returned to the lab.
    • For a list of orders where samples have not been returned, please check your Pending Order List.
  2. The Status column (four from the left) will provide a quick description of the state of the sample.
    • In Progress; the sample is being processed by the lab.
    • Delivered: the results have been delivered and are available for your review.
    • Rejected: their was a problem with the sample.
  3. Any samples with reactive results will be highlighted in light red.


This list can be exported to Excel for further use or exploration.

[Last updated on December 30, 2020]

How To Set Up Notifications

If you'd like to receive notifications when test results are ready, you just need to enable one simple setting in your account.


Start by navigating to My Account > Settings in the navigation menu on the left.

At the bottom of the Account Settings page, you'll see a field titled  Email Subscribe. There are three check boxes next to it:

  • Notification of lab report delivery to physician portal
  • Email 1
  • Email 2

To enable email notifications, you'll need to make sure Notification of lab report delivery to physician portal is checked.

You'll then want to make sure that the check boxes for Email 1 and/or Email 2 are checked to determine where the notifications go.


Don't forget to click SAVE when you're done.

[Last updated on October 22, 2020]

How To Reset Your Password

If you've forgotten your password, but still remember your username, you can easily reset your password.

On our sign in page, you will see a link next to the sign in button titled Forgot your password. Click that link, then enter your username, and complete the human verification action.

If your username exists in our database, we will send an email to the email account associated with that username.

Just follow the instructions in the email, and you should be all set.

[Last updated on August 26, 2020]

How to Place a Toxicology E-Order

1. Secure Account Login
file-9PMDLWyUy8


  1. Navigate to the secure login URL: https://lis.moleculartestinglabs.com.
  2. Upon arriving to the site, please enter the unique username and password provided in the welcome e-mail.
  3. Enter the CAPTCHA Validation code and click “Sign in”.
  4. If this is your first login, you will be prompted to create a new password. Please keep username and password credentials private and secure.


2. New Toxicology Order
file-DyRmrIc3ip


  1. Click the “Internet Order” tab and select “TOX New Order”.
  2. There are four tabs to be completed when placing an order. Begin with the patient information. All fields in red are required.


3. Specimen Intake & Billing
file-dzxb1lpQwl


  1. Enter the collection date and then choose the appropriate payor type from the drop-down menu:

    • Medicare
    • Medicaid
    • Work Comp
    • Self Pay / Uninsured
    • Other / Commercial Insurance

  1. Each Payor type will have specific fields that need to be completed. See below for further instructions on each payor type.
3A. Medicare Payor Selection
file-TgplmElMi7


  1. The Medicare Beneficiary ID Number (MBI) is required.
  2. If the MBI is not available, the patient Social Security Number must be entered.
  3. All other fields are helpful in processing the patient claim in a timely manner.
3B. Medicaid Payor Selection
file-Sjj6Tojo2v


  1. Please fill out any all information you can provide for patients who are participants in the state Medicaid plan.
3C. Work Comp Payor Selection
file-tolLWeb0Nu


  1. Date of Injury and claim number are required, along with the name of the Work Comp provider.
  2. Phone number and payor address are helpful in processing the patient claim in a timely manner.
  3. The ICD10 code related to the injury is required.
3D. Self Pay / Uninsured Payor Selection
file-jCs6EQzTvC


  1. No information is required on this page, but diagnosis codes will still be required in the test order selection pages.
3E. Other / Commercial Insurance Payor Selection
file-rGB0fBa8nB


  1. Payor name, policy number, and group number are required.
  2. Guarantor name and relationship to patient can be “Self” but if the primary plan is under a parent or spouse, their name and relationship must be provided.
  3. Phone number and payor address are helpful in processing the patient claim in a timely manner.


4. Testing Selection
file-F43jFSYjE5


  1. Select the specimen type.
  2. Select testing.
  3. “Screen to Confirm” or “Screen Only” testing is available for clinics that did not perform or bill for screening on the specimen. Confirmation-only options are only offered for analytes where no lab screen is available.
  4. “Screen to Confirm” or “Screen Only” testing will not be available to clinics that have already performed and billed for screening on the specimen, however additional “Confirmation Only” options will be available.


5. Patient Medication
file-VLRuWRkgMq


  1. Patient Medications are searched in the left table and moved over to the right table.
  2. If you are entering an order for an existing patient, medications listed in the previous orders will be auto-populated into the right table and should be checked for accuracy.
  3. Medications can be moved back and forth between tables using the arrow buttons between the tables.


6. Summary Page
file-dZeDikuQMo


  1. The provider should review all the information entered on the previous tabs.
  2. To edit a section click the “Edit” button.
  3. Once the provider has verified that all the information is correct, the provider can enter their electronic signature PIN to submit the order.


7. Confirmation Page
file-B20Si8YMEh


  1. ALL specimens are required to have at least two unique patient identifiers listed on the collection device. The confirmation page will display an image of the specimen label, including the information that is required to be listed on it. 

  2. If multiple specimen types are used, a sticker will need to be completed for each specimen. 

  3. Specimens labeled incorrectly will be rejected. 

[Last updated on November 10, 2020]
Send us a message

How can we help?

We usually respond in a few hours

Address: 14401 SE 1st Street, Vancouver, WA 98684

© 2023 Molecular Testing Labs. All Rights Reserved. CLIA #50D2050397 CAP #8690528